Soldering is an essential skill for electronics hobbyists, engineers, and makers. As integral as it is to building and repairing circuits, it brings with it one significant health hazard: fumes. When solder melts, it releases smoke packed with flux vapors and tiny particulates. Prolonged exposure can irritate your eyes, throat, and lungs, and in enclosed spaces, the risks compound quickly. Yet, in so many workbenches and DIY corners, the faint haze of solder smoke is treated as part of the job rather than an avoidable risk.
The good news? You don’t need to break the bank with a commercial fume extractor. With a handful of components, a dash of ingenuity, and a little bit of soldering (just this once!), you can build a highly effective 12V DIY solder fume extractor. In this comprehensive guide, we’ll break down the why, the how, and the best tips for building a compact, reliable smoke prevention solution for your soldering station.
---
## Why Extract Soldering Fumes?
### Health Hazards
The most common soldering wire contains rosin flux, which, when heated, vaporizes into fine particles and compounds. Inhaling these can cause:
- **Irritation**: Eyes, nose, and throat discomfort.
- **Respiratory Issues**: Increased coughing, asthma symptoms, or even chronic bronchitis with long-term exposure.
- **Allergic Reactions**: Sensitization to flux fumes can make symptoms worse over time.
- **Toxicity**: Older solder often contains lead, and even lead-free variants may release metals and chemicals.
### The Solution
A fume extractor draws contaminated air away from your face, passing it through filters (often activated carbon) that trap these harmful substances. For hobbyists on a budget, making a custom extractor confers three main benefits:
- **Customization**: Build to your workspace and needs.
- **Affordability**: Often less than half the cost of a retail unit.
- **Satisfaction**: The joy of a project that improves your every build session.
---
## How a Solder Fume Extractor Works
A typical solder fume extractor consists of three main parts:
1. **Fan**: Creates airflow, drawing in fumes.
2. **Filter**: Usually made of activated carbon to capture particulate matter and neutralize fumes.
3. **Enclosure/Shroud**: Directs air through the filter and prevents bypass.
The fan, often a 12V DC type, is the heart of the extractor. It creates negative pressure near the soldering tip, ensuring fumes are captured before they disperse in the room. The activated carbon filter traps most particles and absorbs many gases, freshening the air as it passes through.
---

## Tools & Materials
Before diving in, gather the following supplies:
### Core Components
- **12V DC Fan** – A 120mm x 120mm computer case fan is ideal for low noise and ample airflow.
- **Activated Carbon Filter Pads** – Easily available online (look for “replacement fume extractor filters” or “carbon foam pads”).
- **12V Power Adapter** – Capable of supplying at least 0.5A (most wall adapters or even USB-to-DC cables work).
- **Switch** (optional) – To toggle your extractor on/off.
- **Wiring** – A short length of flexible wire.
- **Connector** (optional) – Barrel jack or similar, for tidy power connection.
### Enclosure
- **Plastic or Metal Project Box** – Large enough to house your fan and filter (for a 120mm fan, a 5"x5" or similar box).
- **Mesh Grill** – Both to protect fingers and support the filter.
- **Foam Tape or Weatherstrip** – For sealing and noise isolation.
### Tools
- Soldering Iron & Solder (for basic wiring).
- Screwdriver.
- Hot Glue Gun or Epoxy.
- Wire Strippers/Cutters.
- Drill (for switch and vent holes, if needed).
---
## Step-by-Step Build Guide
### 1. Planning & Layout
Visualize your enclosure: The fan should pull air through the filter, not push. The filter must sit between your workspace and the fan intake. Sketch your box’s cutout locations for the fan, filter placement, and switch/power wire access.
### 2. Preparing the Enclosure
- **Mark and cut** a hole in the **front** face of your box, sized to your fan (usually 120mm square). The fit should be snug, so the fan mounts flush.
- **Drill holes** for mounting screws and, if using, a switch.
- If your project box has ventilation holes, ensure they are on the exhaust side, not the intake.
### 3. Mounting the Fan
- **Install the fan** inside the box, so it pulls air from the outside (filter side) to the inside (exhaust).
- Secure with screws, or, for a lighter build, use hot glue.
- Ensure airflow direction: The airflow arrow on the fan shows which way air moves – this should point *away* from the filter, *toward* the exhaust.
### 4. Preparing the Filter
- **Cut the activated carbon pad** to the size of your fan.
- Place the pad on a mesh grill (e.g., a metal fan guard or DIY from hardware cloth), ensuring it can be easily removed for replacement.
- Attach the pad/grill assembly to the outside of the fan mount. You can sandwich it between the fan and the box, or fix it to the front with foam tape to ensure no air escapes around the edges.
### 5. Wiring
- **Connect the fan leads** to your power cable. If you’re using a switch, wire it inline with the positive lead.
- Solder connections securely, and cover with heat-shrink tubing or electrical tape for safety.
- Attach your power connector or wire the cable directly for simplicity.
- *Tip:* Some fans include built-in speed controls or LEDs – keep wiring simple for reliability.
### 6. Assembly & Testing
- Check all seals around the filter and fan. Use foam tape or weatherstrip to fill gaps.
- Mount the completed assembly into your box.
- Plug in your power supply and switch the unit on.
- Test by soldering nearby and watching the visible smoke – it should be drawn rapidly toward the filter and not escape into the room.
---
## Enhancing Your Build
### Alternative Fans
While a standard 120mm fan is quiet and effective, if you want a compact extractor for a cramped bench, try an 80mm or 92mm fan. For professional-level performance, consider a high-CFM “blower” or dual-fan array.
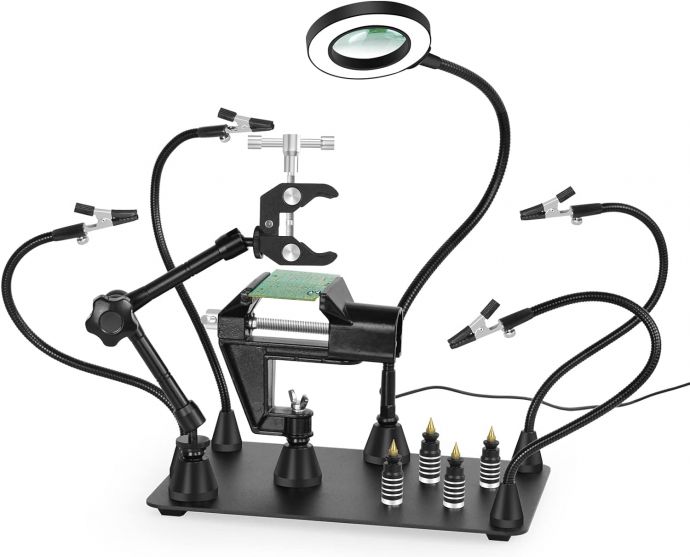
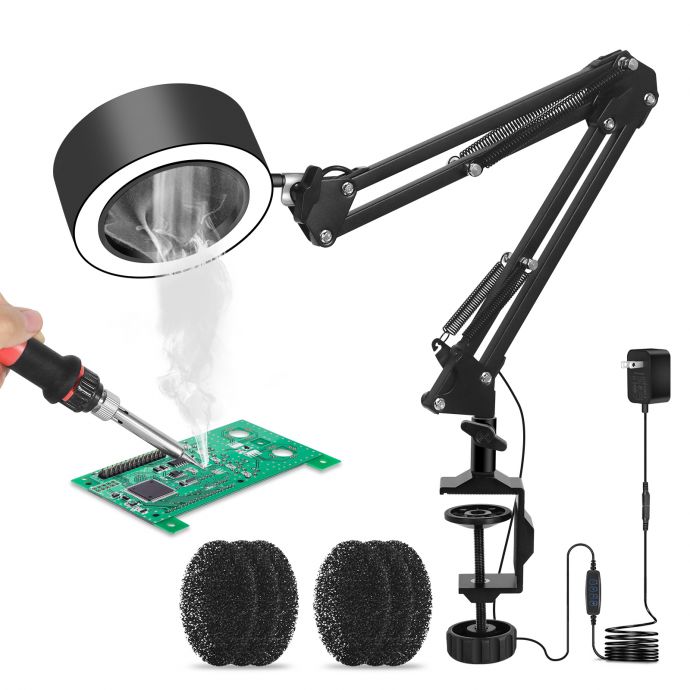
### Flexible Stands and Arms
Mount your fan unit on an adjustable arm or gooseneck (salvaged from old desk lamps, for example) for hands-free positioning right above your work. Magnetic bases can keep your extractor stable yet portable.
### Filter Upgrades
Stacking two layers of activated carbon, or mixing with a HEPA-rated pre-filter, boosts particle capture (helpful if you solder leaded parts often).
### Lighting
Attach an LED strip to your fume extractor’s shell for integrated bench lighting, illuminating fine work and showing off your build.
---
## Operation & Maintenance Tips
- **Placement**: Always position your extractor as close as possible to your soldering iron tip—within 4-6 inches is ideal.
- **Filter Care**: Replace filter pads regularly. As a rule of thumb, replace every 2-4 weeks if soldering daily, or when you notice reduced airflow or persistent odors.
- **Clean the fan blades** (unplug first!) periodically to avoid dust and sticky flux buildup.
- **Noise Management**: Most 12V fans are very quiet, but if yours is loud, try mounting on soft rubber pads or using a fan controller to slow it slightly.
---
## Real-World Performance
How does a DIY fume extractor compare to retail versions?
| Feature | DIY Extractor | Commercial Model |
|----------------------|------------------------|-------------------------|
| Cost | $15-30 (typical) | $40-120+ |
| Airflow (CFM) | 40-70 (120mm computer) | 35-70 (small desktop) |
| Size | Customizable | Fixed |
| Filter Replacement | Inexpensive, scalable | Often proprietary |
| Portability | Easy to adapt | Mainly compact units |
| Looks | DIY charm | Sleeker/more uniform |
DIY solutions nearly always provide equal or better airflow for a fraction of the price. The main advantage of commercial units is a polished look and, sometimes, rugged filter mounts.
---
## Responsible Soldering: Beyond the Extractor
While your fume extractor cuts exposure drastically, a few habits go further:
- **Ventilate**: Open windows or use a second fan to circulate room air.
- **Use safer flux**: “No-clean” or low-residue fluxes emit fewer fumes.
- **Work mindfully**: Keep your head out of the direct path above your soldering tip.
- **Stay updated**: Clean and maintain your extractor regularly.
---
## Conclusion: Breathing Easy and Soldering Smart
A DIY 12V solder fume extractor is not just a practical build—it’s a crucial investment in your health and longevity as a maker. In under an hour and with basic tools, you can transform your soldering environment from hazardous to healthy, all while learning and customizing your workspace.
Most importantly, you’re demonstrating the core value of electronics: using creativity to solve real-world problems. So as you fire up your soldering iron next time, rest easy—your lungs will thank you, and your projects will