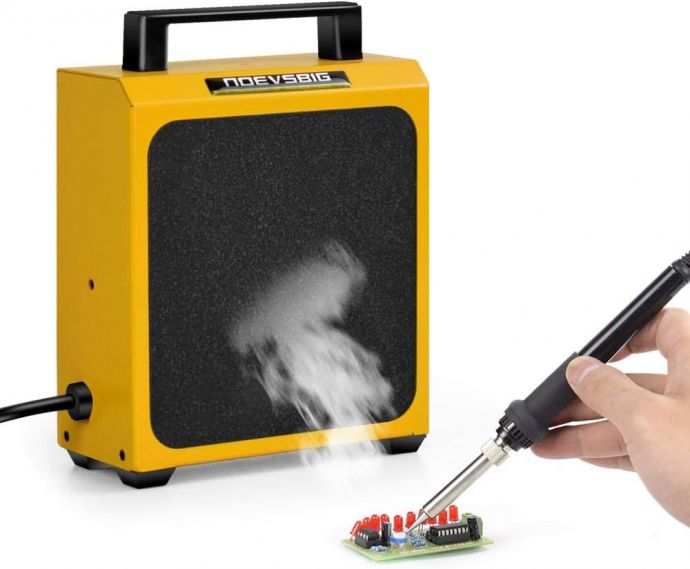
If you spend any time soldering, whether as a hobbyist, DIY enthusiast, maker, or electronics professional, you know that success hinges on precision, skill—and safety. Amid the sparks and melted alloys, it’s easy to overlook the invisible threat: solder fumes. These wispy emissions seem harmless, but they are packed with toxic particulates and gases like rosin, flux residues, and, potentially, lead vapor. For your long-term health, it’s crucial to address this risk. But do you really need to shell out a small fortune on a fume extractor? Absolutely not. With the 6.7 DIY Smoke Absorber, you can build an effective, reliable, and budget-friendly fume extraction system that protects your lungs and keeps your workspace pleasant.
## Why Solder Fumes Are No Joke
Let’s start with the basics: what’s in solder smoke, and why should you care?
- **Flux smoke** (rosin and synthetic): Irritates eyes, nose, and throat; can trigger asthma-like symptoms.
- **Lead vapor**: If you use leaded solder, inhalation can contribute to the accumulation of heavy metals in the body, with potentially severe neurotoxic effects.
- **Particulate matter**: Tiny airborne particles that irritate the lungs and can exacerbate breathing conditions.
Symptoms range from short-term coughing and watery eyes to long-term respiratory problems. The bottom line? Solder fumes are harmful, and every electronics workstation needs proper extraction—even if you only solder occasionally.
## Store-Bought Smoke Absorbers: The Pros and Cons
Before we jump into DIY territory, let’s see what commercial solutions offer. Professional-grade smoke absorbers can cost anywhere from $50 to $300 or more. They typically feature:
- Replaceable activated carbon filters
- Quiet operation
- Adjustable stands or arms
The main issue? Budget. For makerspace teams or hobbyists, purchasing several units isn’t always viable. And low-cost store-bought models often compromise on air volume and filter quality—they can be little more than glorified fans.
## Meet the 6.7 DIY Smoke Absorber
This project is named for its compact 6.7-inch (170mm) square form factor. Why 6.7? It’s the perfect size for space-strapped benches, makes filter replacement easy, and maximizes airflow without being bulky or noisy.
### The Key Benefits:
- **Affordable**: Build for less than $30 using readily available components.
- **Effective**: When built right, it outperforms many cheap commercial models in airflow and filtration.
- **Customizable**: Adapt it to your space, needs, and even aesthetics.
- **Quiet & unobtrusive**: You won’t be disturbed by excessive noise or vibration.
- **Sustainable**: Use replaceable (or even refillable) filters to keep your costs and environmental impact down.
Let’s break down how you can build one from scratch.
## Materials & Components
The core of the smoke absorber consists of a high-flow DC fan and an activated carbon filter. Here’s what you’ll need:
- **120mm or 140mm DC fan** *(12V or 24V; the bigger, the better for airflow with low noise)*
- **120mm or 140mm activated carbon filter pads** *(readily available online or from air purifiers)*
- **6.7-inch (170mm) square frame or case** *(a wooden or acrylic box, leftover plastic container, 3D-printed shell, or even an old computer fan guard)*
- **Wiring and switch** *(inline rocker switch or toggle)*
- **Power supply** (matching your fan voltage; wall adapter or USB)
- **Mounting hardware**: screws, rubber anti-vibration mounts, double-sided tape, or hot glue
- **Optional: HEPA filter sheet** for additional particulates capture
### Tools:
- Screwdriver set
- Soldering iron (ironically!)
- Small saw or cutting tools (if shaping the enclosure)
- Drill for mounting holes
## Building Your 6.7 DIY Smoke Absorber
### Step 1: Plan and Source
Check the size of your fan and filters: the most common setup is 120mm, but we’re aiming for a 6.7” (170mm) square face to ensure good coverage and airflow. Shop for a fan with high CFM (cubic feet per minute) output at moderate noise levels (around 30-40dBA).
Activated carbon filter pads come in generic 120mm or 140mm squares, often marketed as replacements for electronics or air purifiers—grab a pack so you can swap out filters regularly.
### Step 2: Prepare the Enclosure
You can get creative here. Upcycle an empty food storage container (just drill a hole for airflow). Or, build a box from plywood, MDF, or acrylic panels. A 3D-printed shell is also an option, but isn’t necessary if you’re looking for speed and cost savings.
Cut an opening the size of your fan in one panel—this will be the front face. On the rear, add some ventilation slits or a large opening for the clean air to exit.
### Step 3: Mount the Fan
Mount the fan so it *pulls* air through the filter and exhausts at the back (or side). Use anti-vibration mounts or foam strips to prevent rattling.
Attach the wiring: most DC fans come with a red (+) and black (-) cable. You can wire these directly to a DC barrel jack (for a plug-in power supply), or replace the fan cable with a USB plug if your fan is 5V compatible.
Add a switch in the positive line—an inline rocker or toggle switch works great and gives you easy on/off control.
### Step 4: Insert the Filters
Cut the activated carbon filter pad to fit snugly over the fan’s intake. For best results, sandwich the carbon pad between two layers of metal mesh or coarse filter foam for support and to catch larger particles. If you wish, add a second stage using a cut-to-fit HEPA filter sheet behind the carbon filter for even finer filtration.
Hold the filters in place with a simple grille, retaining clips, or just use the pressure of the enclosure lid.
### Step 5: Assembly and Final Touches
Assemble the box and double-check airflow direction: the fan should draw contaminated air *through* the filter, not the other way around. Securely fasten the lid or front panel so it’s easy to open and replace filters as needed.
Optionally, add rubber feet or a kickstand to keep the smoke absorber sturdy and angled toward your work area.
## Using Your DIY Smoke Absorber
Position the unit as close to your soldering area as practical—2-6 inches is ideal, but not so close it interferes with your iron or workpiece. Turn it on before you make your first solder joint, and leave it running for a few minutes afterward to clear out residual smoke.
When you notice a drop in performance or if the carbon pad starts to discolor or smell, swap in a new pad—typically every 2-8 weeks, depending on use frequency.
## Tips for Maximum Efficiency
- **Seal leaks**: Any gaps around the fan or enclosure edges can cause dirty air to bypass the filter. Use foam tape or hot glue to seal seams if needed.
- **Upgrade the fan**: Brushless DC fans deliver higher air volumes at lower noise, and PWM models offer speed control.
- **Double filtration**: Combine carbon and HEPA filters for both gas and particulate removal.
- **Monitor airflow**: Occasionally check airflow by holding a tissue in front of the intake; if it barely moves, the filter may be clogged.
- **Noise reduction**: Lining the interior of your box with thin foam can reduce noise and vibration.
- **Maintenance**: Wipe down internal surfaces every few months, especially in high-use environments.
## Health Advantages Over Working Without a Filter
Inhaling solder fumes without protection is a documented health risk, especially in poorly ventilated spaces. The simple addition of an effective smoke absorber:
- Reduces your exposure to hazardous substances
- Lessens eye, nose, and throat irritation
- Supports healthier lungs and respiratory system
- Reduces strong odors lingering in your workspace
These benefits aren’t just for frequent solderers—you’ll notice clearer air and less “solder headache” even if you only do occasional projects.
## Customization and Upgrades
Once you’ve built the basic absorber, you can adapt the design further:
- **Add a speed controller**: For quieter operation during lighter tasks.
- **Go portable**: Use a rechargeable battery pack or a USB-powered fan for use at events or field work.
- **Light it up**: Mount a work light or LED strip to improve visibility at your bench.
- **High-end enclosures**: For permanent setups, build into your bench or combine with an articulated arm to direct airflow exactly where you need.
- **Aesthetics**: Vinyl-wrap your enclosure, use color-matched switches, or laser-engrave a front plate for a professional look.
## Real-World Results
Numerous makers have shared their experiences with DIY smoke absorbers, and the consensus is clear: these homebuilt units work as well or better than many commercial options under $100. And because they’re modular, you can replace the filter and fan independently, extending the life of your extractor for years.
Users regularly cite:
- Significantly reduced odor in the workspace
- No more burning eyes or cough after long soldering sessions
- Quick, easy filter replacement (no expensive proprietary cartridges)
- Peace of mind from knowing their lungs are better protected
## Conclusion: Protect Your Workspace—and Yourself
Building a 6.7 DIY Smoke Absorber is cost-effective, straightforward, and delivers real protection for anyone working with