Soldering is an essential skill for anyone working with electronics, jewelry, or metalworking, but as every hobbyist and professional knows, it comes with certain hazards. Among these, exposure to soldering fumes is a leading concern—especially with the growing understanding of how harmful inhaling flux smoke and particulate matter can be over time. Protecting your lungs while soldering is not just a comfort; it's a necessity.
This is where a smoke absorber becomes an invaluable tool for your workspace. However, commercial smoke absorbers can be costly and lack customization, compelling many creators and engineers to seek a more personalized and affordable solution. In this guide, we’ll walk you through creating your own 6.7” DIY smoke absorber—a powerful and innovative fan system designed to keep your workspace clean, protect your lungs, and ensure you can focus on precision work without health concerns.
---
## Why Is Smoke Absorption Crucial in Soldering?
Before we dive into the build, it’s important to recognize the risks. Soldering fumes often contain rosin-based flux particulates and lead fumes (if using traditional solder)—both classified as irritants and, in prolonged exposures, potentially contributors to respiratory issues such as asthma, chronic bronchitis, or more severe conditions. Even lead-free solder with non-rosin fluxes emits emissions that are best avoided.
But with an effective smoke absorber, these emissions are rapidly captured and filtered, significantly reducing the amount of hazardous material released into your breathing zone. This ensures you’re both comfortable and safe, giving you peace of mind during those hours spent designing and building.
---
## Meet the 6.7” DIY Smoke Absorber
A well-designed smoke absorber consists of three principal components:
1. **A powerful yet quiet fan**
2. **An efficient filtering medium**
3. **A thoughtfully engineered enclosure**
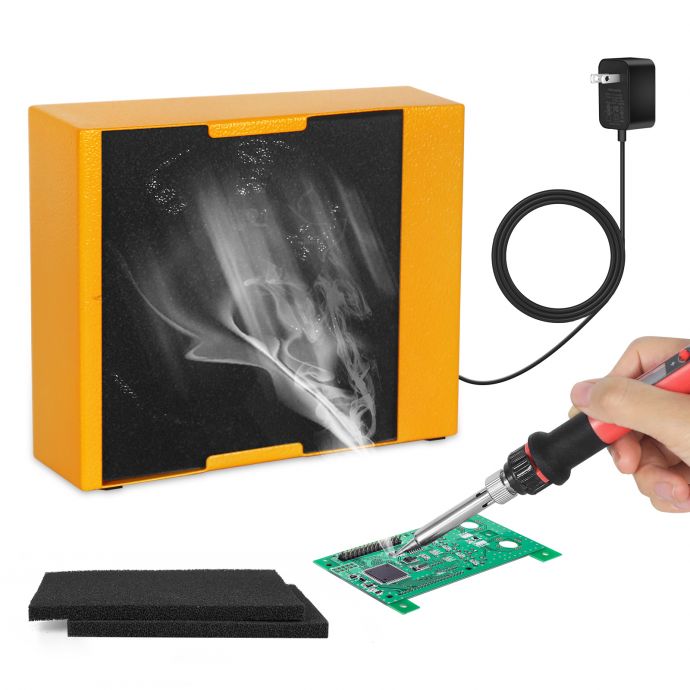
Our 6.7” DIY Smoke Absorber uses a 170mm (6.7”) brushless DC fan, combined with a multi-layer activated carbon filter, all housed in a compact, portable shell constructed from easy-to-source materials. The system is designed to be robust, energy-efficient, and suitable for any hobbyist or pro workspace. Let’s break down each of these elements.
---
## Essential Materials and Tools
### **Materials List**
- **Fan:** 170mm (6.7”) 12V DC brushless exhaust fan (minimum 1200 CFM recommended)
- **Activated Carbon Filter Sheets:** Cut to fit a 170mm x 170mm area, 2-3 layers for optimal filtering
- **Fine Particle Filter Material:** Such as HEPA filter media, to capture fine particulate matter
- **Sturdy Housing:** ABS plastic project box or build your own from acrylic or PVC sheets
- **On/Off Rocker Switch** and **DC Barrel Jack** for power control
- **12V DC Power Adapter** (matching fan specifications)
- **Screws, Washers, Rubber Stand-Offs** for mounting and vibration dampening
- **Foam Tape** or weatherstripping to seal edges and reduce air leaks
### **Tools Needed**
- Cordless Drill
- Hot Glue Gun
- Phillips Screwdriver
- Soldering Iron (for wiring switches and power)
- Wire Cutters/Strippers
- Utility Knife or Dremel Tool
---
## Building the Smoke Absorber: Step-by-Step
### 1. **Design the Enclosure**
First, plan your enclosure layout. The housing needs to be slightly larger than your fan (about 180mm x 180mm x 80mm internal volume) to accommodate the fan, multiple filter layers, and airflow space. Good airflow paths ensure smoke doesn’t escape before being filtered.
**DIY Tip:** Use black ABS plastic for a professional look and durability. If using sheets, solvent-weld the edges or use corner brackets for strength.
### 2. **Install the Fan**
Cut out a 170mm diameter opening in the rear face of your enclosure. Mount the fan so it pulls air **into** the housing (negative pressure), drawing smoke through the filters which will be installed on the front face.
Use rubber stand-offs or silicone grommets when mounting the fan to minimize vibration and noise.
### 3. **Prepare the Filters**
Cut two or three sheets of activated carbon material to match the front opening of the enclosure. Sandwich these between two layers of fine HEPA filter material. HEPA will trap particulates while the activated carbon neutralizes fumes and odors.
Layering is key—arrange as follows (from air intake towards fan):
- HEPA Filter Layer
- Activated Carbon Layer(s)
- HEPA Filter Layer (optional)
### 4. **Secure the Filter Assembly**
Design the front panel of your housing with a removable filter bay. This could be as simple as a press-fit frame held by spring clips or threaded screws. Use foam tape around edges to ensure a tight seal—smoke should pass only through the filter stack, not around it.
### 5. **Wire Up the Electronics**
Connect the fan, switch, and DC barrel jack in a series circuit. Be sure to check your fan’s wiring requirements (many brushless fans are 2- or 3-wire). Solder connections for reliability and insulate with heat-shrink tubing.
Drill small holes for the switch and DC jack on a convenient side. Mark all polarity and connections.
### 6. **Final Assembly and Testing**
Mount all components in the enclosure. Install feet or rubber pads so the device won’t slide or vibrate across your workbench. Plug in, switch on, and verify airflow strength. Hold a lit soldering iron near the intake—the smoke should be swiftly pulled into the absorber and not escape upward.
---
## Enhancing Workspace Safety and Comfort
The 6.7” fan is a game-changer: this size achieves a significant airflow rate, often 2-3 times more than smaller 80–120mm desktop options, capturing smoke even if your hands are busy. Combined with activated carbon and HEPA layers, it efficiently removes a broad spectrum of hazardous substances and fine particulates.
But safe soldering goes beyond smoke extraction:
- **Ventilate the Room:** Use your DIY absorber alongside open windows or an exhaust fan for best results.
- **Choose Safer Solder and Flux:** Lead-free solder, rosin-free flux, and low-fume options further minimize risk.
- **Regular Filter Maintenance:** Replace HEPA and carbon layers every 2–4 months with regular use, or when you notice a decrease in performance or a strong odor.
---
## Customization and Upgrades
Your DIY smoke absorber need not stop at basics. Here are a few ideas for personalizing your setup:
1. **Variable Speed Fan Controller:** A simple PWM (pulse width modulation) controller lets you adjust airflow to match job size and proximity.
2. **Noise Dampening:** Add extra foam inside the housing or choose ultra-quiet fan models for whisper-quiet operation.
3. **Filter Status Indicator:** A simple LED or pressure switch circuit can alert you to reduced airflow, which means it’s time for a filter change.
4. **Lighting:** Attach an LED work light for precision soldering visibility.
---
## A Sustainable Solution
DIY means you’re in charge not just of quality but lifecycle cost and environmental impact. By replacing only the activated carbon and HEPA inserts, you ensure your device never becomes obsolete or unserviceable. Moreover, you choose recyclable materials for housing and components, reducing landfill waste.
---
## Solder Smarter, Solder Safer
The benefits of a dedicated, high-efficiency smoke absorber are tangible:
- You protect your lungs from immediate irritation and long-term health issues.
- You keep your workspace cleaner—no sticky residue or lingering odors on tools, projects, or furniture.
- You can focus on the task at hand, especially precision work, without distraction or worry.
By building your own 6.7” DIY smoke absorber, you invest in your health while saving costs and learning valuable engineering and safety skills along the way. With just a day’s work and minimal outlay, you can transform your soldering setup into a model of safety, cleanliness, and efficiency—giving you complete confidence to tackle your next project.
---
## Conclusion
Every soldering project deserves a safe, clean environment. With the 6.7” DIY smoke absorber, you’ll breathe easier, protect your health, and elevate the quality of your work. No longer a luxury but a must-have for every soldering station—this innovative, user-built fan system stands as both shield and support for all your creative endeavors.
Get started today, and discover the difference that a dedicated smoke absorber makes—one breath, one project, and one safer workspace at a time.