When working with electronics, soldering is an essential skill that brings your projects to life. However, many hobbyists and professionals overlook a significant aspect of their workspace—the health hazards caused by solder fumes. Inhaling these fumes over time can cause respiratory issues, headaches, and allergies due to the flux and lead (in legacy solder) vaporizing during the soldering process. Creating a safe environment is crucial for both comfort and well-being, and one of the simplest yet most effective solutions is to add a fume extractor to your soldering station.
This comprehensive guide will walk you through building a robust DIY fume extractor based on the reliable 6.7-inch (170mm) fan. We'll cover principles of fume extraction, why it matters, required materials, step-by-step assembly, customization tips, and usage best practices. Let's ensure your workspace is smoke-free, so your electronics projects remain a source of joy and not a health risk.
---
## Why Build Your Own Fume Extractor?
Solder fume extractors are widely available as off-the-shelf products. But building your own offers several benefits:
- **Customization:** Tailor the extractor to fit your workspace, power requirements, and aesthetics.
- **Performance:** Commercial extractors may underperform, especially in hobbyist setups with limited airflow or insufficient filtering.
- **Savings:** DIY solutions can be more budget-friendly, especially if you already own some components.
- **Learning:** It’s a rewarding project that enhances your understanding of air filtration and electronics.
---
## Understanding Fume Extraction
Solder smoke contains particulates and chemicals released by flux and, with leaded solder, trace amounts of lead. Even lead-free solder produces irritants. These fumes should never accumulate in your breathing zone.
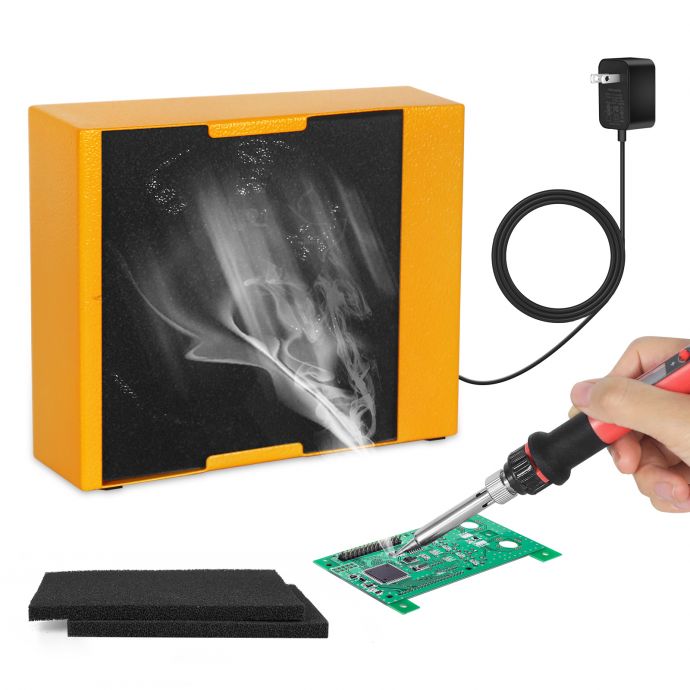
A fume extractor draws contaminated air away from the soldering area, passes it through a filter (usually activated carbon and HEPA), and recirculates cleaner air into the room. The heart of this system is the fan, which determines how efficiently smoke is captured and removed.
---
## Planning Your 6.7-Inch DIY Fume Extractor
### Project Goals
- **Effective smoke capture:** Reduce exposure to harmful fumes directly at the source.
- **Customizable airflow:** Adjust power and airflow direction as needed.
- **Compact design:** Integrates easily with your existing soldering station.
- **Serviceability:** Simple to maintain, with filters that are easy to replace.
### Why a 6.7-Inch (170mm) Fan?
The 170mm fan combines a large surface area (for broad coverage) with reasonable noise and power consumption. It offers higher airflow (CFM) compared to smaller fans or desktop units, ensuring smoke is quickly drawn away from your face.
---
## Materials & Tools List
**Core Components:**
- 6.7-inch (170mm) DC or AC fan (12V DC recommended for easy integration)
- Sturdy enclosure or housing (3D-printed, laser-cut acrylic, or repurposed electronics case)
- Activated carbon filter pad (specifically for soldering or air purifiers)
- HEPA filter sheet (optional, for fine particulates)
- Fan grill or mesh (to prevent contact with blades)
- Switch (toggle or rocker)
- DC power supply (12V adapter) or variable bench supply
**Optional Enhancements:**
- Speed controller (PWM or voltage regulation)
- LED work light integration
- Adjustable stand or gooseneck mount
- Decorative panels or custom paint
**Tools Needed:**
- Screwdrivers, wire cutters, soldering iron (for wiring)
- Drill and bits (for mounting holes)
- Hot glue or epoxy (for securing parts)
- Measuring tools
- Electrical tape or heat-shrink tubing
---
## Step-By-Step Assembly Guide
### 1. Designing the Enclosure
Your enclosure serves as both a fan mount and a housing for the filter. It can be built from scratch, 3D-printed, or adapted from a surplus electronics box. The ideal form factor is a shallow box, about 170–200mm square and 70–100mm deep, deep enough for the fan and filter but still compact.
**Tips:**
- Add a removable back or front panel for easy filter replacement.
- Integrate a handle or adjustable foot to direct airflow as needed.
- Ensure enough air enters through the filter without excessive resistance (avoid too many tight bends behind the fan).
### 2. Mounting the Fan
Place the 170mm fan behind the intake grill, facing so that air is *drawn into* the enclosure and passes through the filter before exiting. Mark and drill mounting holes, affixing the fan securely using screws, shock mounts, or spacers.
**Wiring:** If using a DC fan, ensure polarity is observed. For AC fans, use caution and insulate connections well. Route wires toward where you’ll mount your switch and power supply input.
### 3. Integrating the Filters
**Activated Carbon Filter:** Cut the filter pad to match the intake area. Mount it directly in front of the fan or sandwich it between a front grill and the lid. The idea is to pass all incoming air through this pad.
**HEPA Filter (Optional):** Place a thin HEPA sheet behind the carbon filter if you want fine particulate removal. This adds resistance, so if your fan seems sluggish, use only carbon.
**Retention:** Secure filters with a simple frame, clips, or pressure fit. Make changing filters easy—you’ll need to every few months, depending on use.
### 4. Wiring and Controls
Attach power lines to the fan, routed through your main switch for easy on/off control. For DC fans, you can add a PWM controller or potentiometer inline for variable speed.
- Connect the LED light, if using, to the same circuit or with a separate switch.
- Ensure all wiring is neat, insulated, and anchored away from moving parts or high-current paths.
### 5. Finishing Touches
- Attach protective grill or mesh at the front (user side) of the extractor.
- Add feet or rubber pads to stabilize the unit on your workbench.
- Optionally, add a handle or adjustable stand for perfect positioning.
- Test airflow before sealing the enclosure fully—make sure no gaps allow unfiltered air to bypass.
---
## Tips for Custom Fan Integration
If you're integrating your fume extractor into an existing soldering station, consider the following modifications:
- **Mounting Bracket:** Design a custom bracket that attaches to your workbench or the side of your soldering station. This can be 3D printed or made from bent metal/aluminum.
- **Gooseneck Holder:** For maximum flexibility, use a gooseneck lamp arm or magic arm mount so you can position the extractor close to your work.
- **Foot Switch:** Add a simple foot pedal to control the extractor hands-free, so it only runs when you're soldering.
- **Inline Power Supply:** If your soldering station has a 12V auxiliary out, you can power the fan directly, reducing desktop clutter.
---
## Using Your DIY Fume Extractor
To get the most protection:
- Position the extractor **4–8 inches** from the solder tip, between you and the work, so fumes are drawn away before they reach your breathing zone.
- Use the highest fan speed tolerable (balance airflow with noise).
- Replace carbon filters regularly, at least every 2–3 months with regular use, or when you notice decreased effectiveness.
- Clean the front grill and enclosure periodically to remove dust.
---
## Maintenance and Troubleshooting
**Low Airflow:** Check for clogged filters, blocked grill, or incorrect fan polarity.
**Excessive Noise or Vibration:** Ensure fan is properly secured and that no wires touch the blades. Check for unbalanced filters.
**Odor Lingering:** It’s time to change the carbon filter.
**Fan Not Running:** Double-check power connections, switch, and any inline fuses.
---
## Advanced Features and Modifications
As you get more comfortable, consider these upgrades:
- **Air Quality Sensor Integration:** Use an Arduino or ESP8266 with a simple air quality sensor to automatically activate the extractor when fumes are detected.
- **Multiple Fan Banks:** Chain two or more smaller fans if you desire a slim, wide design (such as for large workbenches).
- **Ducted Exhaust:** Route the cleaned air outdoors for maximal removal, especially in small or poorly ventilated rooms.
- **Filter Upgrade:** Invest in specialized soldering fume filters with both HEPA and carbon media for maximum protection.
---
## Conclusion
Building your own 6.7-inch fume extractor is a practical, satisfying DIY project that pays dividends in workspace safety and comfort. With only a handful of parts and a modest investment, you can ensure that each electronics session is free from hazardous smoke and unpleasant odors. Moreover, customizing your fume extractor to your exact requirements enhances your workspace ergonomics and can even save money over expensive commercial solutions.
Remember, your health is as important as the gadgets you build. A good fume extractor is an investment not just in your projects, but your ability to keep enjoying electronics for years to come. With the right airflow, filter, and positioning, you’ll truly breathe easier while soldering—making your workspace a safer, more enjoyable place to create.
---
Start planning your own extractor today—your lungs will thank you. Happy soldering!